Description
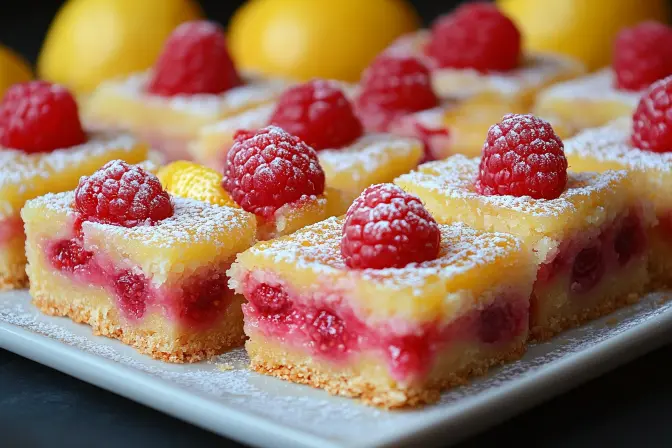
These Raspberry Lemon Bars are a vibrant and delectable treat that perfectly balances the tartness of lemon with the sweet-tart burst of fresh raspberries. A buttery, melt-in-your-mouth shortbread crust forms the foundation for a creamy, tangy lemon filling studded with swirls of homemade raspberry puree. A dusting of powdered sugar adds a final touch of elegance to these irresistible bars. They’re ideal for afternoon tea, potlucks, or simply as a bright, cheerful dessert to brighten any day. Prepare to be delighted by the symphony of flavors and textures in every bite!
Why You Will Love This Recipe
There are so many reasons to fall in love with these Raspberry Lemon Bars!
- Flavor Explosion: The combination of zesty lemon and sweet raspberries creates a taste sensation that’s both refreshing and satisfying.
- Perfect Texture: The buttery, crumbly crust, the smooth and creamy lemon filling, and the jammy raspberry swirls offer a delightful textural contrast.
- Homemade with Love: Using fresh raspberries to create your own puree elevates the recipe and allows you to control the sweetness and intensity of the flavor.
- Visually Stunning: The bright yellow lemon filling swirled with vibrant red raspberry puree makes these bars a feast for the eyes as well as the palate.
- Make-Ahead Friendly: These bars can be made a day or two in advance, making them perfect for entertaining. They actually taste even better after a day or two in the refrigerator, as the flavors meld together beautifully.
- Easy to Adapt: You can easily adapt this recipe to your liking. For example, you could use different berries, such as blueberries or blackberries, to create a unique flavor combination.
- Guaranteed Crowd-Pleaser: These bars are always a hit at parties and gatherings. Everyone loves the bright, fresh flavors and the beautiful presentation.
- Simple Elegance: Despite their sophisticated taste and appearance, these bars are surprisingly easy to make with simple ingredients.
- Versatile Dessert: Perfect for a light dessert, a tea party treat, or even a brunch addition, these bars are versatile for any occasion.
- The Perfect Balance: Achieving the right balance of sweet, tart, and buttery flavors makes these bars incredibly addicting and enjoyable.
Ingredients:
Crust
- 8 ounces unsalted butter, at room temperature (1 cup)
- ½ cup granulated sugar
- 2 cups all-purpose flour
- ¼ teaspoon kosher salt
- 1 teaspoon lemon zest, grated
Raspberry Puree (makes ¾ cup)
- 2 tablespoons granulated sugar
- ¼ cup lemon juice
- 2 teaspoons cornstarch
- 1 cup raspberries
Lemon Filling
- 7 large eggs
- 3 cups granulated sugar
- 2 tablespoons lemon zest, grated
- 1 cup lemon juice, freshly-squeezed
- 1 cup all-purpose flour
- Powdered sugar, Confectioners’ sugar for dusting
Preparation:
Crust
Step 1: Preheat oven to 350°F (175°C).
Step 2: Lightly spray a 9×13-inch baking pan with cooking spray. This will prevent the crust from sticking and make it easier to remove the bars later.
Step 3: Using a mixer fitted with a paddle attachment, cream the butter and sugar together on medium speed (about 2 minutes) until light in color and fluffy. Creaming the butter and sugar properly is crucial for a tender and light crust. Don’t rush this step!
Step 4: Add the lemon zest and mix for a few seconds. The lemon zest adds a subtle hint of citrus that complements the lemon filling.
Step 5: Combine the flour and salt in a separate bowl. This ensures that the salt is evenly distributed throughout the dough.
Step 6: With the mixer on low, add the flour mixture to the butter mixture until just mixed, about 1 minute. Be careful not to overmix the dough, as this can result in a tough crust. Mix until just combined, and no streaks of flour remain.
Step 7: Place the dough onto a well-floured board and gather into a ball and transfer to the baking pan. Using your fingers, evenly press and flatten the dough into the baking pan. Ensure the dough is evenly distributed across the pan for a consistent crust.
Step 8: Chill the dough for 15 minutes. Chilling the dough helps prevent it from shrinking during baking.
Step 9: Bake the crust for 15 to 20 minutes, until very lightly browned. Keep a close eye on the crust while it’s baking to prevent it from burning.
Step 10: Cool the crust in the baking sheet on a wire rack for about 30 minutes, until the dough is slightly firm. This allows the crust to cool down enough to handle before adding the lemon filling. Keep oven heated to 350°F (175°C).
Raspberry Puree
Step 1: Put the sugar, cornstarch, and lemon juice in a small saucepan and whisk together. Whisking these ingredients together before adding the raspberries prevents lumps from forming.
Step 2: Add raspberries to the saucepan.
Step 3: Cook over medium heat, constantly whisking until the puree has broken down and thickened and has come to a bubble, about 6 minutes. The constant whisking prevents the raspberries from sticking to the bottom of the pan and ensures a smooth puree.
Step 4: Strain the hot thickened puree, discarding the seeds. This step is optional, but it will result in a smoother, more refined puree. Use a fine-mesh sieve to remove the seeds effectively. Set the strained puree aside, at room temperature until ready to use.
Lemon Filling
Step 1: To make the filling, whisk together the eggs, sugar, lemon zest, and flour until combined. Make sure there are no lumps of flour remaining.
Step 2: Gradually add the lemon juice and whisk until combined. Adding the lemon juice gradually helps prevent curdling.
Step 3: Pour the lemon filling over the cooled crust.
Step 4: Add about a tablespoon-sized spoonfuls of raspberry puree around the entire surface of the lemon mixture. Distribute the puree evenly for beautiful swirls.
Step 5: Quickly drag a toothpick across the surface to create swirls. Be careful not to over-swirl, as this can muddy the colors.
Step 6: Carefully transfer to the oven.
Step 7: Bake for 30-35 minutes until the filling is set in the center. The filling should be firm but still have a slight jiggle.
Step 8: Let cool to room temperature. Then chill bars for at least 2 hours or overnight before cutting.
Step 9: Cut into squares or triangles and dust with confectioners’ sugar.
COOKING Rating:
Intermediate
Serving Suggestions:
- Serve chilled or at room temperature.
- Dust generously with powdered sugar just before serving.
- Garnish with fresh raspberries or a sprig of mint.
- Serve with a scoop of vanilla ice cream or a dollop of whipped cream.
- Pair with a cup of hot tea or coffee.
- Perfect for potlucks, picnics, or afternoon tea.
Tips:
- Use room temperature butter for the crust for easy creaming.
- Don’t overmix the crust dough to avoid a tough texture.
- Chill the crust before baking to prevent shrinking.
- Strain the raspberry puree for a smoother consistency.
- Use fresh lemon juice for the best flavor.
- Don’t overbake the lemon filling; it should be slightly jiggly in the center.
- Allow the bars to cool completely before cutting for clean slices.
- Store leftover bars in an airtight container in the refrigerator for up to 3 days.
Prep Time:
30 minutes
Cook Time:
50-55 minutes
Total Time:
1 hour 20 minutes + cooling time
Nutritional Information:
(Note: Nutritional information is approximate and may vary based on specific ingredients and serving size.)
Calories: Approximately 350-400 per bar
Protein: Approximately 4-5 grams per bar
Sodium: Approximately 50-75 mg per bar
Conclusion
These Raspberry Lemon Bars are a delightful combination of sweet, tart, and buttery flavors that are sure to impress. With a simple shortbread crust, a creamy lemon filling, and swirls of homemade raspberry puree, these bars are a perfect treat for any occasion. Whether you’re serving them at a party, enjoying them with a cup of tea, or simply indulging in a sweet craving, these Raspberry Lemon Bars are a guaranteed crowd-pleaser. Enjoy the process of making them and savor every delicious bite!
Questions and Answers
Q1: Can I use frozen raspberries instead of fresh raspberries for the puree?
A: Yes, you can definitely use frozen raspberries! Just make sure to thaw them completely and drain any excess liquid before adding them to the saucepan. Frozen raspberries may release more liquid during cooking, so you might need to cook the puree for a slightly longer time to achieve the desired thickness. The flavor might be slightly different compared to fresh raspberries, but the puree will still be delicious and add a wonderful raspberry flavor to the bars.
Q2: What if I don’t have a stand mixer? Can I still make the crust?
A: Absolutely! While a stand mixer makes creaming the butter and sugar easier, you can definitely make the crust by hand. Use a pastry blender or your fingertips to cut the cold butter into the flour and sugar until the mixture resembles coarse crumbs. Then, add the lemon zest and mix until just combined. The key is to work quickly and avoid overworking the dough, as this can result in a tough crust.
Q3: How do I prevent the lemon filling from cracking while baking?
A: Cracking in lemon bars can sometimes happen due to rapid temperature changes or overbaking. To minimize cracking, ensure your oven temperature is accurate and avoid opening the oven door frequently during baking. Baking the bars at a slightly lower temperature (say, 325°F or 160°C) for a longer time can also help. Additionally, allowing the bars to cool slowly in the oven with the door slightly ajar after baking can prevent sudden temperature changes and reduce the likelihood of cracking.
Q4: Can I substitute the all-purpose flour with gluten-free flour?
A: Yes, you can substitute the all-purpose flour with a gluten-free blend, but keep in mind that the texture of the crust and filling might be slightly different. Look for a gluten-free flour blend that contains xanthan gum, which will help bind the ingredients together and prevent the crust from becoming too crumbly. You might also need to adjust the amount of liquid in the filling slightly to achieve the desired consistency.
Q5: How long can I store these Raspberry Lemon Bars, and what’s the best way to store them?
A: These Raspberry Lemon Bars can be stored in an airtight container in the refrigerator for up to 3 days. Storing them in the refrigerator helps to keep the filling firm and prevents the crust from becoming soggy. For longer storage, you can freeze the bars for up to 2 months. Wrap them tightly in plastic wrap and then place them in a freezer-safe container. Thaw the bars in the refrigerator overnight before serving. They actually taste really good cold too!