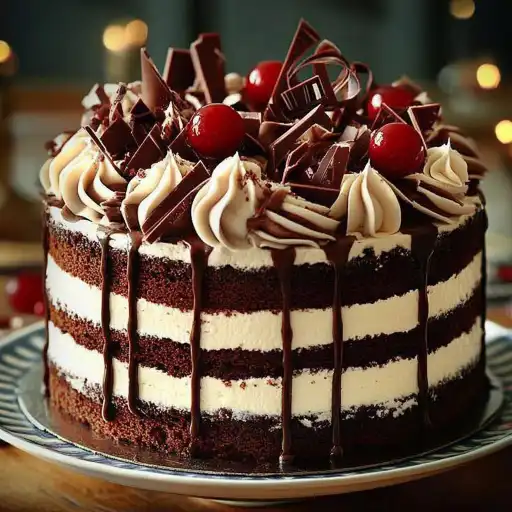
This classic German dessert, the Black Forest Layer Cake, or Schwarzwälder Kirschtorte, is a symphony of flavors and textures. Imagine moist chocolate sponge layers soaked in cherry syrup, generously filled with luscious whipped cream and tangy cherry compote, all topped with dark chocolate shavings and decadent ganache. This cake is not just a dessert; it’s an experience.
Why you will love this recipe:
This recipe perfectly balances rich chocolate, sweet cherries, and light, airy cream. The homemade chocolate sponge is incredibly moist and tender, while the cherry filling offers a delightful burst of fruity flavor. The combination of Kirsch (cherry liqueur), if used, adds a subtle warmth and complexity that elevates the entire cake. The whipped cream is light and fluffy, providing the perfect counterpoint to the richness of the chocolate and cherries. Overall, this cake is a showstopper that’s surprisingly achievable at home.
Ingredients:
For the Chocolate Sponge Cake:
- 1 ¾ cups (220 g) all-purpose flour
- ¾ cup (65 g) unsweetened cocoa powder
- 2 tsp baking powder
- 1 ½ tsp baking soda
- ½ tsp salt
- 2 cups (400 g) sugar
- ½ cup (120 ml) vegetable oil
- 2 large eggs
- 1 cup (240 ml) buttermilk
- 2 tsp vanilla extract
- 1 cup (240 ml) hot coffee (or hot water)
For the Cherry Filling:
- 2 cups (300 g) pitted cherries (fresh or canned)
- ½ cup (100 g) sugar
- 2 tbsp cornstarch + 3 tbsp water (slurry)
- 1 tbsp Kirsch (cherry liqueur) — optional
For the Whipped Cream Filling:
- 2 ½ cups (600 ml) heavy whipping cream
- ½ cup (60 g) powdered sugar
- 2 tsp vanilla extract
For Decoration:
- 1 cup (150 g) dark chocolate shavings
- Chocolate curls or bars (optional)
- Whole cherries (fresh or maraschino)
For Ganache Drip (optional but stunning):
- ½ cup (120 ml) heavy cream
- 100 g dark chocolate, chopped
Preparation:
Step 1: Bake the Chocolate Cakes
Preheat your oven to 350°F (175°C). This is crucial for even baking. Grease and line three 8-inch round cake pans with parchment paper. This ensures that the cakes release easily and don’t stick to the bottom. In a large mixing bowl, whisk together the all-purpose flour, unsweetened cocoa powder, baking powder, baking soda, salt, and sugar. Make sure there are no lumps.
Step 2: Combine Wet Ingredients
In the same bowl, add the vegetable oil, large eggs, buttermilk, and vanilla extract. Mix well using an electric mixer on medium speed until all the ingredients are fully combined. The batter will appear slightly thick at this point.
Step 3: Add Hot Liquid
Slowly add the hot coffee (or hot water) to the batter while mixing on low speed. The hot liquid helps to bloom the cocoa powder and creates a very moist cake. Mix until the batter is smooth and relatively thin. Don’t worry if it seems a little runny; this is normal.
Step 4: Bake
Divide the cake batter evenly among the prepared cake pans. Use a kitchen scale for perfect precision and consistent layers. Bake in the preheated oven for 25–30 minutes, or until a wooden skewer inserted into the center comes out clean. The cakes should spring back lightly when touched.
Step 5: Cool the Cakes
Remove the cakes from the oven and let them cool in the pans for about 10 minutes before inverting them onto a wire rack to cool completely. This prevents the cakes from sticking and allows them to cool evenly.
Step 6: Make the Cherry Filling
While the cakes are cooling, prepare the cherry filling. In a medium saucepan, combine the pitted cherries (fresh or canned), sugar, and cornstarch slurry (cornstarch mixed with water). The cornstarch slurry helps to thicken the filling.
Step 7: Cook the Filling
Cook the cherry mixture over medium heat, stirring constantly, until it thickens and becomes glossy. This usually takes about 5–7 minutes. Be careful not to burn the bottom of the saucepan.
Step 8: Add Kirsch (Optional)
Remove the saucepan from the heat and stir in the Kirsch (cherry liqueur), if using. The Kirsch adds a wonderful depth of flavor to the cherry filling. Let the filling cool completely before assembling the cake.
Step 9: Prepare Whipped Cream
In a large mixing bowl, beat the chilled heavy whipping cream, powdered sugar, and vanilla extract with an electric mixer until stiff peaks form. Be careful not to overwhip the cream, or it will turn into butter. The whipped cream should be light and airy.
Step 10: Make the Ganache (Optional)
If you’re making the ganache drip, heat the heavy cream in a small saucepan until it’s steaming but not boiling. Pour the hot cream over the chopped dark chocolate in a heatproof bowl.
Step 11: Stir Until Smooth
Let the mixture sit for a minute or two to allow the chocolate to melt, then stir gently until the ganache is smooth and glossy. Let it cool slightly before dripping it onto the cake. If the ganache is too hot, it will melt the whipped cream.
Step 12: Assemble the Cake
Place one chocolate cake layer on a cake stand or serving plate. Brush the cake layer lightly with cherry syrup (if you have it from canned cherries). This adds extra moisture and flavor. Spread a generous layer of whipped cream evenly over the cake layer.
Step 13: Add Cherry Filling
Top the whipped cream with a layer of the cooled cherry filling. Make sure to distribute the cherries evenly.
Step 14: Repeat Layers
Repeat the layering process with the second chocolate cake layer, whipped cream, and cherry filling.
Step 15: Final Layer and Frosting
Add the final chocolate cake layer on top. Frost the entire cake with the remaining whipped cream, creating a smooth and even surface.
Step 16: Decorate
Pipe cream swirls around the top edge of the cake, if desired. This adds a decorative touch.
Step 17: Add Cherries
Place whole cherries (fresh or maraschino) on top of the cream swirls or arrange them attractively on the cake.
Step 18: Sprinkle Chocolate
Sprinkle the dark chocolate shavings generously over the top and sides of the cake.
Step 19: Drizzle Ganache (Optional)
If you made the ganache, drizzle it along the edges of the cake, allowing it to drip down the sides for a stunning effect.
Step 20: Add Chocolate Curls (Optional)
Place chocolate curls or bars on top of the cake for an elegant and professional finish.
COOKING Rating:
Intermediate. While the recipe is straightforward, it requires multiple components and careful attention to detail.
Serving Suggestions:
Serve chilled. This cake is best enjoyed cold, allowing the flavors to meld together. Pair with a glass of sweet dessert wine, coffee, or a scoop of vanilla ice cream for an extra indulgent treat. It’s perfect for birthdays, holidays, or any special occasion.
Tips:
- For a more intense cherry flavor, soak the cherries in Kirsch for a few hours before making the filling.
- Use high-quality chocolate for the ganache and shavings for the best flavor.
- If you don’t have buttermilk, you can make a substitute by adding 1 tablespoon of lemon juice or white vinegar to 1 cup of milk and letting it sit for 5 minutes.
- To prevent the cake layers from drying out, wrap them tightly in plastic wrap and store them in the refrigerator until ready to assemble.
- Chill the assembled cake for at least 2-3 hours before serving to allow the flavors to meld and the whipped cream to set.
Prep Time: 1 hour Cook Time: 30 minutes Total Time: 4 hours (including cooling and chilling)
Nutritional Information: (Per slice, approximate) Calories: 450 Protein: 6 g Sodium: 200 mg
Conclusion
The Black Forest Layer Cake is more than just a dessert; it’s a celebration of flavors and textures. The combination of rich chocolate, sweet cherries, and light whipped cream creates a truly unforgettable experience. While it may seem intimidating to make at home, this recipe breaks down the process into manageable steps, allowing you to create a show-stopping cake that will impress your friends and family. Whether you’re celebrating a special occasion or simply craving a decadent treat, the Black Forest Layer Cake is sure to satisfy your sweet tooth. With its moist chocolate sponge, tangy cherry filling, and creamy whipped topping, this cake is a classic for a reason. So, gather your ingredients, put on your apron, and get ready to bake a masterpiece!
5 Questions and Answers About This Recipe:
Q1: Can I use frozen cherries instead of fresh or canned?
A: Yes, you can use frozen cherries. Make sure to thaw them completely and drain any excess liquid before using them in the filling. You may need to adjust the amount of cornstarch slightly to achieve the desired consistency.
Q2: Can I make the cake layers ahead of time?
A: Absolutely! In fact, it’s recommended. You can bake the cake layers up to two days in advance. Wrap them tightly in plastic wrap and store them in the refrigerator. This will help to keep them moist and prevent them from drying out.
Q3: Is Kirsch necessary for the cherry filling?
A: No, Kirsch is optional. However, it does add a distinctive flavor that enhances the overall taste of the cake. If you prefer not to use alcohol, you can substitute it with cherry juice or almond extract.
Q4: How long will the assembled cake last in the refrigerator?
A: The assembled cake will last for up to 3 days in the refrigerator. Make sure to store it in an airtight container to prevent it from drying out or absorbing any odors.
Q5: Can I use a different type of chocolate for the ganache?
A: Yes, you can use milk chocolate or semi-sweet chocolate for the ganache if you prefer. Keep in mind that the flavor will be different, so choose a chocolate that complements the other flavors in the cake.