Description
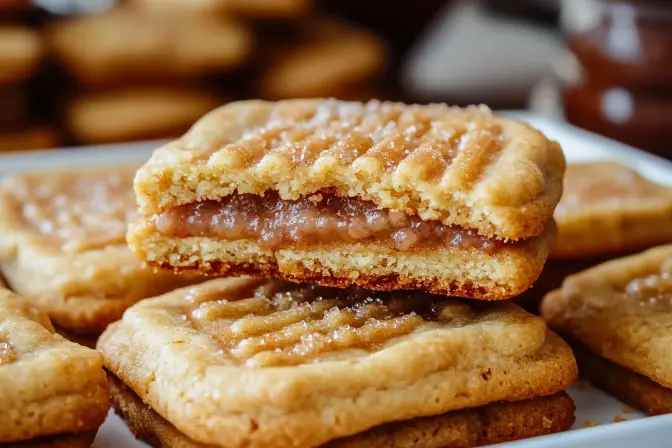
These Brown Sugar Pop Tart Cookies are a delightful twist on the classic childhood treat. Imagine the comforting flavor of a brown sugar pop tart, but in a soft, chewy, and perfectly portioned cookie form. These cookies feature a tender cake-like dough infused with vanilla, a rich and gooey brown sugar filling spiced with cinnamon, and a sweet brown sugar glaze that drizzles decadently over the top. They’re surprisingly easy to make, requiring no complicated techniques, and the result is a cookie that’s guaranteed to bring a smile to anyone’s face. Perfect for an afternoon treat, a bake sale, or simply to satisfy a craving for something sweet and nostalgic. This recipe uses cake flour which provides a softer and more tender texture, resulting in a melt-in-your-mouth experience that is irresistibly delicious.
Why You Will Love This Recipe
- Nostalgic Flavor: Capture the essence of your favorite childhood breakfast pastry in a cookie!
- Easy to Make: Straightforward instructions and readily available ingredients make these cookies approachable for bakers of all skill levels.
- Impressive Presentation: The glazed finish and neat round shape make these cookies visually appealing, perfect for gifting or serving at gatherings.
- Customizable: Easily adapt the filling and glaze flavors to suit your personal preferences. Try adding chopped nuts to the filling or a touch of maple extract to the glaze.
- Perfect Texture: The combination of cake flour and cornstarch results in a soft, tender, and slightly chewy cookie that’s simply divine.
Ingredients:
Cookies
- 1 cup (2 sticks) unsalted butter, softened to room temperature
- 1/2 cup granulated sugar
- 1 cup light brown sugar, packed
- 2 large eggs, at room temperature
- 1 teaspoon vanilla extract
- 3 3/4 cups cake flour
- 2 Tablespoons cornstarch
- 1 teaspoon baking soda
- 1 1/2 teaspoons baking powder
- 1 teaspoon kosher salt
Brown Sugar Filling
- 5 Tablespoons unsalted butter, softened
- 3/4 cup light brown sugar, packed
- 1 teaspoon ground cinnamon
- 2 Tablespoons cake flour
Brown Sugar Glaze
- 1 cup powdered sugar
- 1/2 teaspoon ground cinnamon
- 3 Tablespoons unsalted butter, melted and cooled slightly
- 2 1/2 Tablespoons milk (or more, to adjust consistency)
Preparation:
Step 1: Prepare the Dough
In the bowl of a stand mixer fitted with the paddle attachment (or using a hand mixer), cream together the softened butter, granulated sugar, and brown sugar on medium-high speed for 2-3 minutes. The mixture should be light and fluffy. This step is crucial for incorporating air into the dough, resulting in a tender cookie. Ensure your butter is truly softened but not melted. Cold butter won’t cream properly, and melted butter will result in flat cookies. Scrape down the sides and bottom of the bowl occasionally to ensure even mixing.
Step 2: Add Wet Ingredients
Add the eggs, one at a time, to the creamed mixture, beating well after each addition. Mix in the vanilla extract. The eggs should be at room temperature; this helps them emulsify better with the butter and sugar, contributing to a smoother dough. Don’t overmix at this stage, as it can develop the gluten in the flour, leading to tough cookies.
Step 3: Combine Dry Ingredients
In a separate medium bowl, whisk together the cake flour, cornstarch, baking soda, baking powder, and salt. Whisking ensures that the leavening agents (baking soda and baking powder) are evenly distributed throughout the flour. Cake flour is key here; it has a lower protein content than all-purpose flour, resulting in a more tender cookie. Cornstarch further contributes to the soft texture.
Step 4: Incorporate Dry Ingredients into Wet
Gradually add the dry ingredients to the wet ingredients, mixing on medium speed until just combined. Be careful not to overmix. Overmixing develops the gluten in the flour, leading to a tough cookie. Stop mixing as soon as the dry ingredients are incorporated. Scrape down the sides and bottom of the bowl as needed to ensure even mixing.
Step 5: Chill the Dough
Cover the dough with plastic wrap and chill in the refrigerator for at least one hour. This chilling period is essential. It allows the gluten in the flour to relax, preventing the cookies from spreading too much during baking. It also firms up the dough, making it easier to handle and shape.
Step 6: Prepare the Brown Sugar Filling
While the dough is chilling, prepare the brown sugar filling. In a medium bowl, combine the softened butter, brown sugar, cinnamon, and cake flour. Stir until smooth and well combined. The filling should have a paste-like consistency.
Step 7: Preheat and Prepare Baking Sheets
Preheat your oven to 350°F (175°C) and line two large baking sheets with parchment paper. Parchment paper prevents the cookies from sticking to the baking sheets and makes for easy cleanup.
Step 8: Assemble the Cookies
Scoop the chilled dough using a 1/4 cup measuring cup (or a large cookie scoop). Divide each scoop of dough in half. Flatten one half of the dough slightly and create a well in the center. Place a heaping teaspoon (about 2 teaspoons) of the brown sugar filling into the well. Top with the other half of the dough and pinch the edges together to seal in the filling. Gently roll the filled dough into a ball to create a smooth, even surface.
Step 9: Bake the Cookies
Arrange the cookie dough balls on the prepared baking sheets, spacing them about 2 inches apart. Bake for 11-13 minutes, or until the tops are just set and the edges are lightly golden brown. Be careful not to overbake the cookies; they should still be slightly soft in the center.
Step 10: Cool and Glaze
Let the cookies cool on the baking sheets for 5 minutes before transferring them to a wire rack to cool completely. While the cookies are cooling, prepare the brown sugar glaze. In a small bowl, whisk together the powdered sugar, cinnamon, melted butter, and milk until smooth. Add more milk, one teaspoon at a time, if needed to reach your desired consistency. Place a piece of parchment paper under the cooling rack to catch any drips. Spoon the glaze over the cooled cookies, allowing it to drip down the sides. Let the glaze set for about 15 minutes before serving.
COOKING Rating:
- Difficulty: Easy to Medium
- Time Commitment: Moderate
- Taste: Delicious!
Serving Suggestions:
- Serve warm or at room temperature with a glass of milk or a cup of coffee.
- These cookies are perfect for bake sales, parties, or as a homemade gift.
- Pair them with vanilla ice cream for a decadent dessert.
Tips:
- Use room temperature ingredients for the best results.
- Don’t overmix the dough.
- Chill the dough for at least one hour before baking.
- Be careful not to overbake the cookies.
- Adjust the consistency of the glaze by adding more milk or powdered sugar as needed.
- For an extra touch, sprinkle the glazed cookies with cinnamon sugar or finely chopped nuts before the glaze sets.
- Store the cookies in an airtight container at room temperature for up to 3 days.
Prep Time: 30 minutes
Cook Time: 11-13 minutes
Total Time: 1 hour 45 minutes (including chilling time)
Nutritional Information: (per cookie, approximate)
- Calories: 250-300 (depending on size and ingredients)
- Protein: 2-3 grams
- Sodium: 100-150 mg
Conclusion
These Brown Sugar Pop Tart Cookies are a delightful and nostalgic treat that’s perfect for any occasion. The combination of the soft, tender dough, the gooey brown sugar filling, and the sweet brown sugar glaze creates a flavor explosion that will transport you back to your childhood. They are easy to make, customizable, and guaranteed to be a hit with both kids and adults alike. So gather your ingredients, preheat your oven, and get ready to bake up a batch of these irresistible cookies! They’re sure to become a new family favorite.
Questions and Answers About This Recipe
Q1: Can I use all-purpose flour instead of cake flour?
A: While you can technically substitute all-purpose flour for cake flour, the texture of the cookies will be different. All-purpose flour has a higher protein content, which will result in a chewier, less tender cookie. If you must use all-purpose flour, try substituting 2 tablespoons of the flour with 2 tablespoons of cornstarch. This will help to mimic the lower protein content of cake flour and create a slightly softer texture. Be aware, however, that the cookies will still not be quite as delicate as they would be with cake flour.
Q2: Can I freeze the cookie dough or baked cookies?
A: Absolutely! Both the cookie dough and the baked cookies can be frozen. For the dough, wrap it tightly in plastic wrap and then in a freezer bag. You can freeze it for up to 2-3 months. When ready to bake, thaw the dough in the refrigerator overnight and proceed with the recipe as directed. For the baked cookies, allow them to cool completely, then place them in a single layer on a baking sheet and freeze for about an hour. Once frozen, transfer them to a freezer bag or airtight container. This prevents them from sticking together.


