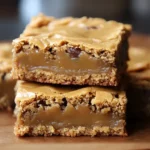
Description
These Crispy Salted Caramel Cookies are an irresistible treat that combines the comforting sweetness of caramel with a delightful hint of salt, all nestled within a perfectly crisp cookie. Imagine biting into a cookie that offers a satisfying snap, followed by the smooth, decadent embrace of caramel and the contrasting zing of sea salt. The buttery, caramelized notes mingle in perfect harmony, creating a symphony of flavors that will leave you craving more. These cookies are not just dessert; they’re an experience. Perfect for holiday baking, afternoon tea, or a simple indulgence any day of the week, these cookies are easy to make and even easier to devour! They’re the ideal balance of sweet and salty, making them a crowd-pleaser for all ages.
Why you will love this recipe
You’ll absolutely adore this recipe for Crispy Salted Caramel Cookies because it’s:
- Effortlessly Delicious: It’s a straightforward recipe that delivers exceptional flavor and texture without requiring advanced baking skills. Even novice bakers can achieve perfect results.
- A Perfect Balance of Flavors: The combination of sweet caramel, rich butter, and a touch of salt creates a delightful harmony that tantalizes the taste buds. It’s a sweet treat that doesn’t overwhelm but leaves you wanting more.
- Crispy and Chewy Texture: The cookies boast a satisfying crispiness around the edges with a slightly chewy center, providing a delightful mouthfeel.
- Versatile: You can easily customize this recipe to suit your preferences. Experiment with different types of caramel, add chocolate chips, or use various flavored salts.
- Make-Ahead Friendly: The dough can be prepared ahead of time and stored in the refrigerator or freezer, allowing you to bake fresh cookies whenever the craving strikes.
- Perfect for Gifting: These cookies make a wonderful homemade gift for friends, family, and neighbors. Their unique flavor and elegant presentation are sure to impress.
- Simple Ingredients: You probably already have most of the ingredients in your pantry, making it easy to whip up a batch whenever the mood hits.
Ingredients:
- 1 cup (230g) unsalted butter, room temperature
- 1/2 cup (100g) brown sugar
- 1/4 cup (50g) granulated sugar
- 1/3 cup (75g) caramel sauce or soft caramels, melted
- 1 large egg
- 1 teaspoon vanilla extract
- 2 cups (240g) all-purpose flour
- 1/2 teaspoon baking soda
- Pinch of salt
- Flaky sea salt, for sprinkling
Preparation:
Step 1: Preheat and Prep: Begin by preheating your oven to 350°F (175°C). While the oven is warming up, line a baking sheet with parchment paper or a silicone baking mat. This crucial step ensures that the cookies don’t stick and makes cleanup a breeze. Parchment paper is especially recommended as it prevents the bottoms from browning too quickly.
Step 2: Creaming the Butter and Sugars: In a large mixing bowl, cream together the softened butter, brown sugar, and granulated sugar. Use an electric mixer (stand mixer or hand mixer) on medium speed until the mixture becomes light, fluffy, and well combined. This process typically takes 3-5 minutes. The goal here is to incorporate air into the mixture, which contributes to the cookies’ light and tender texture. Scrape down the sides of the bowl periodically to ensure everything is evenly mixed.
Step 3: Adding the Wet Ingredients: Once the butter and sugars are creamed, add the melted caramel sauce (or melted soft caramels), the egg, and vanilla extract. Mix on medium speed until all the ingredients are fully incorporated and the batter is smooth. Make sure the caramel sauce isn’t too hot when adding it to the mixture, as this could partially cook the egg. If using soft caramels, ensure they are completely melted and smooth before adding them.
Step 4: Combining the Dry Ingredients: In a separate medium-sized bowl, whisk together the all-purpose flour, baking soda, and pinch of salt. Whisking helps to distribute the baking soda evenly throughout the flour, ensuring a uniform rise and texture in the cookies.
Step 5: Incorporating Wet and Dry: Gradually add the dry ingredients to the wet ingredients, mixing on low speed. Be careful not to overmix, as this can develop the gluten in the flour, leading to tough cookies. Mix just until the flour is fully incorporated and a smooth dough forms. If necessary, use a spatula to scrape down the sides and bottom of the bowl to ensure everything is evenly mixed.
Step 6: Shaping and Baking: Using a cookie scoop or spoon, drop rounded tablespoons of dough onto the prepared baking sheet, spacing them about 2 inches apart. This gives the cookies enough room to spread as they bake. If you want uniform cookies, use a kitchen scale to weigh each portion of dough.
Step 7: Baking to Perfection: Bake the cookies in the preheated oven for 10-12 minutes, or until the edges are golden brown and crisp. The centers should still be slightly soft. Keep a close eye on them, as baking times can vary depending on your oven.
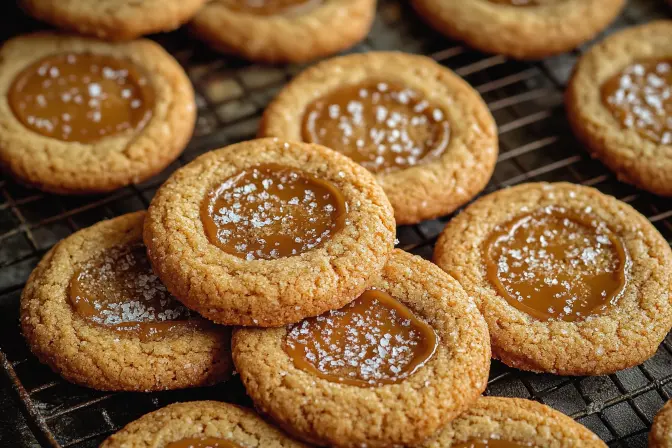
Step 8: Sprinkling with Sea Salt: Immediately after removing the cookies from the oven, sprinkle them generously with flaky sea salt. The heat from the cookies will help the salt adhere to the surface. This step is crucial for achieving that signature salted caramel flavor.
Step 9: Cooling Process: Allow the cookies to cool on the baking sheet for a few minutes before transferring them to a wire rack to cool completely. This prevents them from breaking apart while they’re still soft. Once cooled, they will firm up and become perfectly crispy.
COOKING Rating:
Easy
Serving Suggestions:
- Classic Cookie Platter: Arrange the cookies on a platter with other favorite treats for a delightful dessert spread at gatherings or parties.
- Ice Cream Sandwich: Use the cookies as a base and top for a delicious ice cream sandwich. Vanilla or salted caramel ice cream works particularly well.
- Coffee or Tea Pairing: Serve these cookies alongside a warm cup of coffee, tea, or hot chocolate for a comforting treat.
- Gourmet Gift: Package the cookies in a decorative tin or box and give them as a thoughtful homemade gift.
- After-Dinner Treat: Enjoy a couple of cookies as a simple and satisfying dessert after a meal.
- Party Favors: Wrap individually or in small bundles as party favors for birthdays or special events.
- Elevated Dessert: Crumble the cookies over ice cream or yogurt for added flavor and texture.
Tips:
- Room Temperature Butter: Using room temperature butter is crucial for creaming the butter and sugars properly, which leads to a lighter, more tender cookie.
- Don’t Overmix: Overmixing the dough can result in tough cookies. Mix just until the flour is incorporated.
- Chill the Dough (Optional): For even thicker cookies, chill the dough in the refrigerator for at least 30 minutes before baking.
- Use Quality Caramel: The quality of the caramel sauce or caramels will impact the flavor of the cookies, so choose a high-quality brand that you enjoy.
- Flaky Sea Salt: Don’t skip the flaky sea salt! It really elevates the cookies by providing a burst of salty flavor that complements the sweetness of the caramel.
- Check for Doneness: The cookies are done when the edges are golden brown and crisp, and the centers are set.
- Storage: Store the cookies in an airtight container at room temperature for up to 5 days for optimal freshness.
- Freezing: Freeze the dough balls on a baking sheet before transferring them to a freezer bag or container. Bake straight from frozen, adding a few extra minutes to the baking time.
Prep Time:
15 minutes
Cook Time:
10-12 minutes
Total Time:
25-27 minutes
Nutritional Information:
Approximate values, may vary based on specific ingredients used.
- Calories: 180
- Protein: 1g
- Sodium: 50mg
Conclusion
These Crispy Salted Caramel Cookies are more than just a simple recipe; they are a delightful culinary experience that brings joy with every bite. The perfect combination of sweet, salty, and buttery flavors, combined with their delightful crisp texture, makes them an irresistible treat for any occasion. Whether you’re baking for a holiday gathering, a casual afternoon snack, or a thoughtful homemade gift, these cookies are sure to impress. So, gather your ingredients, preheat your oven, and prepare to indulge in a batch of cookies that will quickly become a family favorite!
Questions and Answers:
Q1: Can I use a different type of salt instead of flaky sea salt? A: Yes, you can substitute flaky sea salt with other types of salt, but keep in mind that the flavor and texture will vary. Kosher salt is a decent alternative, but it doesn’t offer the same burst of saltiness as flaky sea salt. Table salt is not recommended, as it is too fine and can make the cookies overly salty. If you’re feeling adventurous, try using a flavored salt like smoked sea salt or rosemary salt for a unique twist.
Q2: What can I do if my caramel sauce is too thick to mix in easily? A: If your caramel sauce is too thick, gently warm it in the microwave for a few seconds (about 10-15 seconds) or in a saucepan over low heat. This will loosen it up and make it easier to incorporate into the dough. Just be careful not to overheat it, as it can burn.
Q3: Can I add chocolate chips to these cookies? A: Absolutely! Adding chocolate chips is a fantastic way to customize these cookies. Semi-sweet, milk chocolate, or dark chocolate chips all work well. You can also add chopped nuts, such as pecans or walnuts, for extra crunch and flavor. Simply fold in about 1 cup of chocolate chips or nuts into the dough before scooping and baking.
Q4: How do I prevent the cookies from spreading too thin while baking? A: Several factors can contribute to cookies spreading too thin. First, ensure that your butter is at room temperature but not overly soft or melted. Second, chilling the dough for at least 30 minutes before baking can help to prevent spreading. Also, avoid over-greasing the baking sheet, as this can cause the cookies to spread. Finally, make sure your oven temperature is accurate, as an oven that’s too hot can cause the cookies to spread too quickly.
Q5: Can I use pre-made caramel candies instead of caramel sauce? A: Yes, you can use pre-made soft caramel candies instead of caramel sauce. Unwrap the caramels and melt them in a saucepan over low heat with a tablespoon or two of milk or cream, stirring constantly until smooth. Allow the melted caramel to cool slightly before adding it to the cookie dough. Make sure the caramel is fully melted and smooth to ensure it blends evenly into the batter.