Description:
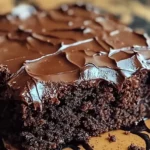
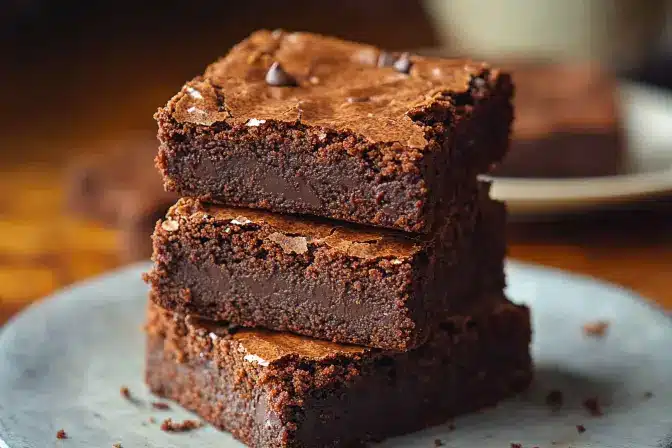
These aren’t just any brownies; they are intensely fudgy, deeply chocolatey squares of pure indulgence. This recipe delivers brownies with a rich, decadent flavor and a texture that strikes the perfect balance between moist and dense. Imagine biting into a brownie where the edges are slightly chewy, yielding to an incredibly soft and gooey center studded with pockets of melted dark chocolate. These brownies are not cakey, and they are not dry. They are the quintessential fudgy brownie experience, elevated by the intensity of Dutch-process cocoa and the luxurious addition of high-quality dark chocolate chunks. Perfect for satisfying your chocolate cravings, sharing with friends, or even gifting (if you can bear to part with them!), these brownies are sure to become a staple in your baking repertoire.
Why you will love this recipe:
You’ll fall in love with these brownies because they are incredibly easy to make, require minimal ingredients, and deliver maximum flavor and texture payoff. Forget complicated recipes and finicky techniques – this one is straightforward and forgiving. The melted butter base ensures a moist and tender crumb, while the combination of granulated and brown sugar adds depth of flavor and a subtle chewiness. The Dutch-process cocoa powder provides a richer, less acidic chocolate flavor compared to natural cocoa. And, of course, the generous amount of dark chocolate chunks creates pockets of intense chocolate delight in every single bite. More than just a recipe, it’s a guaranteed chocolate fix that will have you reaching for seconds (and thirds!). Plus, who doesn’t love the aroma of freshly baked brownies filling the kitchen? It’s pure comfort in a pan. The recipe is easily customizable – feel free to add nuts, dried fruit, or even a swirl of peanut butter for your own unique twist. These brownies are a blank canvas for your baking creativity!
Ingredients:
- 1 cup (2 sticks or 226g) unsalted butter, melted and slightly cooled
- 1 cup (200g) granulated sugar
- 1 cup (220g) packed dark brown sugar
- 4 large eggs
- 2 teaspoons vanilla extract
- 2 tablespoons heavy cream
- 1 cup (125g) all-purpose flour
- ¾ cup (70g) Dutch-process cocoa powder
- ½ teaspoon salt
- 6 ounces (170g) good-quality dark chocolate, chopped (such as Ghirardelli 60% cacao bittersweet chocolate) – divided (reserve some for topping)
**Preparation:**
Step 1: Preheat and Prepare: Preheat your oven to 350°F (175°C). This is crucial for even baking and preventing the brownies from drying out. Lightly grease an 8×12-inch baking dish with butter or cooking spray. Lining the pan with parchment paper, leaving an overhang on the sides, makes it incredibly easy to lift the baked brownies out of the pan. This eliminates the risk of them sticking and makes slicing a breeze.
Step 2: Melt and Cool Butter: Melt the butter in a saucepan over low heat or in the microwave in short intervals (about 30 seconds each), stirring in between to prevent burning. Allow the melted butter to cool slightly before using it. This prevents the hot butter from cooking the eggs when they are added.
Step 3: Whisk Wet Ingredients: In a medium or large mixing bowl, whisk together the slightly cooled melted butter, granulated sugar, and packed dark brown sugar until smooth and well combined. The sugars should dissolve into the butter, creating a homogenous mixture. This step is important for achieving the right texture and preventing a grainy brownie.
Step 4: Add Eggs, Vanilla, and Cream: Add the eggs one at a time, whisking well after each addition. This ensures that the eggs are fully incorporated and contributes to the overall emulsification of the batter. Follow with the vanilla extract and heavy cream. The vanilla enhances the chocolate flavor, and the heavy cream adds richness and moisture. Whisk until the mixture looks slightly lighter in color.
Step 5: Sift Dry Ingredients: In a separate bowl, sift together the all-purpose flour, Dutch-process cocoa powder, and salt. Sifting helps to remove any lumps and ensures that the dry ingredients are evenly distributed throughout the batter. The Dutch-process cocoa provides a deeper, less acidic chocolate flavor than natural cocoa. The salt balances the sweetness and enhances the other flavors.
Step 6: Combine Wet and Dry: Gradually add the dry ingredients to the wet ingredients, gently folding them together with a rubber spatula or wooden spoon until just combined. Be careful not to overmix the batter. Overmixing develops the gluten in the flour, which can result in tough, cakey brownies. The goal is to have a batter that is just barely mixed, with no streaks of flour remaining.
Step 7: Add Chocolate Chunks: Fold in about ¾ of the chopped dark chocolate. Reserve the remaining chopped chocolate for topping. Make sure the chocolate is evenly distributed throughout the batter.
Step 8: Pour and Top: Pour the brownie batter into the prepared baking dish and spread it evenly with a spatula. Sprinkle the reserved chopped chocolate over the top of the batter. This creates a beautiful and tempting chocolatey topping.
Step 9: Bake: Bake in the preheated oven for 35-45 minutes, depending on your preferred level of fudginess. Start checking for doneness around 30 minutes. For fudgier brownies, start checking around 30 minutes. For a more set, sliceable texture, you may need closer to 45 minutes. The center should look set and no longer jiggle, and a toothpick inserted into the center should come out with a few moist crumbs attached, not wet batter. Every oven is different, so start checking early and adjust baking time as needed.
Step 10: Cool Completely: Remove the baking dish from the oven and let the brownies cool in the pan for at least 15-20 minutes. Then, using the parchment paper overhang as handles, carefully lift the brownies out of the pan and place them on a wire rack to cool completely before slicing. The brownies will continue to firm up as they cool, making them easier to slice. Cutting them while they are still warm can result in messy, crumbly brownies. Patience is key!
Step 11: Slice and Serve: Once the brownies are completely cool, slice them into 16 equal-sized pieces. Use a sharp knife and wipe the blade clean between each cut for neat, even slices.
**COOKING Rating:**
Easy
**Serving Suggestions:**
- Serve these fudgy brownies warm with a scoop of vanilla ice cream for a classic and decadent dessert.
- Drizzle with melted chocolate or caramel sauce for an extra touch of indulgence.
- Dust with powdered sugar for a simple and elegant presentation.
- Serve with a glass of cold milk or a cup of hot coffee for a comforting treat.
- Pair with fresh berries for a burst of freshness and contrast to the richness of the brownies.
- Cut them into smaller squares and serve as part of a dessert platter.
- Pack them in lunchboxes for a special treat.
- Take them to potlucks and parties – they are always a crowd-pleaser!
- Warm them slightly in the microwave and top with whipped cream for a quick and easy dessert.
- Enjoy it simply!
**Tips:**
- Don’t Overmix: Overmixing the batter is the biggest mistake you can make when baking brownies. It develops the gluten in the flour, resulting in tough, cakey brownies. Mix just until the ingredients are combined.
- Use Good Quality Chocolate: The quality of the chocolate you use will significantly impact the flavor of the brownies. Use a good-quality dark chocolate with a high cocoa content (at least 60%) for the best results. Ghirardelli, Guittard, or Valrhona are all excellent choices.
- Dutch-Process Cocoa is Key: Dutch-process cocoa powder gives these brownies their rich, dark color and intense chocolate flavor. It is less acidic than natural cocoa powder, resulting in a smoother, more mellow flavor.
- Accurate Oven Temperature: Ensure your oven temperature is accurate for consistent baking results. An oven thermometer can be a helpful tool.
- Cool Completely Before Slicing: Allow the brownies to cool completely before slicing. This will prevent them from crumbling and make it easier to cut neat, even slices.
- Line the Pan with Parchment Paper: Lining the baking dish with parchment paper makes it easy to lift the brownies out of the pan and prevents them from sticking. Leave an overhang on the sides for easy lifting.
- Store Properly: Store the brownies in an airtight container at room temperature for up to 4 days or in the freezer for up to 3 months.
Prep Time: 15 minutes
Cook Time: 35-45 minutes
Total Time: 50-60 minutes
**Nutritional Information:**
Calories: 234kcal Protein: 4g Sodium: 112mg
**Conclusion:**
These Fudgy Brownies with Dark Chocolate Chunks are more than just a recipe; they are an invitation to create a moment of pure indulgence. With their intensely chocolatey flavor, perfectly fudgy texture, and ease of preparation, they are guaranteed to become a beloved treat for you, your family, and your friends. So, gather your ingredients, preheat your oven, and get ready to experience the ultimate brownie bliss! Whether you enjoy them warm with a scoop of ice cream or simply savor them on their own, these brownies are a celebration of all things chocolatey and delicious. Don’t be surprised if you find yourself making them again and again!
Questions and Answers:
Q1: Can I use natural cocoa powder instead of Dutch-process cocoa powder?
A: Yes, you can substitute natural cocoa powder for Dutch-process cocoa powder, but be aware that it will affect the flavor and texture of the brownies. Natural cocoa powder is more acidic than Dutch-process cocoa powder, so it will have a slightly more bitter and tangy flavor. It may also result in a slightly lighter color and a less fudgy texture. If using natural cocoa powder, you may want to add a pinch (about 1/8 teaspoon) of baking soda to help neutralize the acidity.
Q2: Can I add nuts to these brownies?
A: Absolutely! Adding nuts is a great way to customize these brownies and add some extra texture and flavor. Walnuts, pecans, or almonds are all excellent choices. You can add about 1/2 cup of chopped nuts to the batter along with the chocolate chunks. You can also toast the nuts before adding them for a more intense flavor.
Q3: How do I prevent my brownies from being cakey?
A: The key to preventing cakey brownies is to avoid overmixing the batter. Overmixing develops the gluten in the flour, which can result in a tough, cakey texture. Mix the wet and dry ingredients just until they are combined. It’s okay if there are a few streaks of flour remaining. Also, be careful not to overbake the brownies. They should be fudgy and moist in the center.
Q4: Can I freeze these brownies?
A: Yes, these brownies freeze very well. Allow them to cool completely, then cut them into individual squares. Wrap each square tightly in plastic wrap and place them in a freezer-safe bag or container. They can be stored in the freezer for up to 3 months. To thaw, simply remove them from the freezer and let them thaw at room temperature for about 30 minutes.
Q5: What if I don’t have an 8×12-inch baking dish? Can I use a different size?
A: You can use a different size baking dish, but it will affect the baking time and the thickness of the brownies. If you use a smaller baking dish, the brownies will be thicker and may require a longer baking time. If you use a larger baking dish, the brownies will be thinner and may require a shorter baking time. Keep an eye on the brownies while they are baking and adjust the baking time as needed. An 9×13 inch pan will also work, but the brownies will be slightly thinner and bake a little faster. You can also use an 8×8 inch pan, which will result in thicker brownies and require a slightly longer baking time.