Description
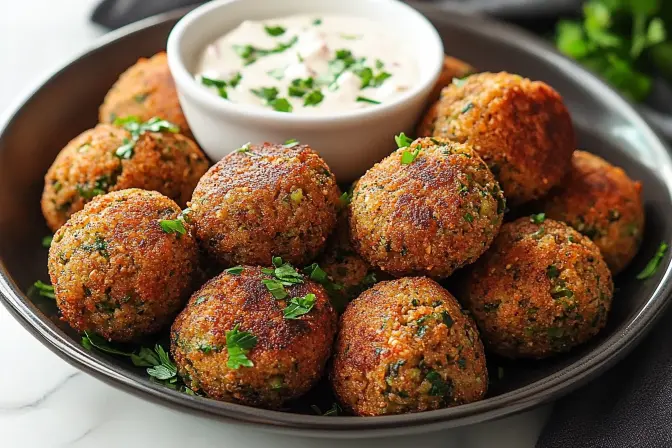
Embark on a culinary journey to the Middle East with this authentic Homemade Falafel recipe. These crispy, flavorful fritters, made from soaked chickpeas and a vibrant blend of herbs and spices, are a delicious and satisfying vegetarian or vegan option. This recipe guides you through each step, from soaking the chickpeas to achieving the perfect golden-brown crust. Whether you’re a seasoned cook or a beginner, this recipe ensures a delightful batch of falafel that will impress your family and friends. Enjoy them in pita pockets, wraps, or as a side dish with your favorite dips and salads.
Why you will love this recipe
You’ll absolutely adore this Homemade Falafel recipe for several compelling reasons:
- Authentic Flavor: This recipe captures the true essence of falafel, delivering a taste that transports you to the bustling streets of the Middle East. The blend of fresh herbs, aromatic spices, and perfectly cooked chickpeas creates a symphony of flavors that will tantalize your taste buds.
- Healthier Option: Unlike store-bought falafel, this homemade version allows you to control the ingredients, ensuring a healthier and more wholesome meal. You can use fresh, high-quality ingredients and adjust the spice levels to your liking.
- Crispy and Delicious: The key to perfect falafel is achieving that crispy exterior while maintaining a soft and flavorful interior. This recipe provides step-by-step instructions to ensure your falafel turns out perfectly every time.
- Versatile and Adaptable: Falafel is incredibly versatile and can be enjoyed in countless ways. Serve it in pita bread with hummus and tahini, top a salad with it for a protein boost, or enjoy it as a snack with your favorite dipping sauce.
- Easy to Make: Despite its exotic flavor, this recipe is surprisingly easy to make. With a few simple ingredients and a food processor, you can whip up a batch of fresh, homemade falafel in no time.
Ingredients:
- 1 cup dried chickpeas
- 1⁄2 large onion, roughly chopped – about 1 cup
- 1⁄2 cup finely chopped fresh parsley
- ¼ cup finely chopped cilantro
- 1 teaspoon salt
- 4 cloves garlic
- 2 teaspoon cumin
- 1 teaspoon ground coriander
- 1 teaspoon baking powder
- 4 Tablespoons chickpea flour – or flour
- Vegetable oil, for frying
Preparation:
step 1
Soak the Chickpeas: Place the dried chickpeas in a large bowl. Cover them with at least a couple of inches of water. This step is crucial for softening the chickpeas, which are then processed to make the mixture. Let them soak for 24 hours, replacing the water if needed to keep them fully submerged. The chickpeas will expand significantly as they absorb water, so make sure to use a sufficiently large bowl. Soaking them allows the chickpeas to hydrate properly, resulting in a smoother and more cohesive falafel mixture. Avoid using canned chickpeas, as they will result in a mushy texture.
Step 2:
Drain the Chickpeas: After soaking for 24 hours, drain the chickpeas thoroughly. Use a colander to ensure all excess water is removed. This step is important to prevent the falafel mixture from becoming too wet, which can affect the texture and make them difficult to form. Patting the chickpeas dry with a clean kitchen towel can further help in removing any remaining moisture.
Step 3:
Process the Ingredients: In a food processor, combine the drained chickpeas with the roughly chopped onion, finely chopped parsley, cilantro, salt, garlic, cumin, and ground coriander. Process the mixture until it is well-blended and chopped but not pureed. Be careful not to over-process, as this can result in a paste-like consistency. The mixture should be coarsely ground, with small pieces of chickpeas and herbs still visible. Pulse the food processor in short bursts, scraping down the sides as needed to ensure all ingredients are evenly processed.
Step 4:
Add Flour and Baking Powder: Transfer the processed mixture to a mixing bowl. Sprinkle the chickpea flour (or regular flour) and baking powder over the mixture. Use a spatula to gently combine all the ingredients until they are evenly distributed. The chickpea flour helps bind the mixture together and adds a nutty flavor, while the baking powder helps to create a lighter and fluffier texture. Ensure there are no lumps of flour or baking powder remaining in the mixture.
Step 5:
Form the Falafel: Using your hands, shape the falafel mixture into small balls about the size of one heaping tablespoon. Flatten each ball slightly and place them on a parchment-lined tray. This will prevent them from sticking to the tray. Continue until all the falafel balls are formed. The size of the falafel can be adjusted to your preference, but keeping them consistent in size will ensure even cooking.
Step 6:
Chill the Falafel: Place the tray of formed falafel balls in the refrigerator for about an hour to allow the mixture to set. Chilling the falafel helps them to hold their shape during frying and prevents them from falling apart in the hot oil. This step is crucial for achieving a crispy exterior and a tender interior.
Step 7:
Heat the Oil: In a large skillet with tall sides, pour in a couple of inches of vegetable oil. Heat the oil over medium heat until it reaches a temperature of around 350°F (175°C). Use a thermometer to ensure the oil is at the correct temperature, as this will affect the cooking time and texture of the falafel. If the oil is not hot enough, the falafel will absorb too much oil and become greasy.
Step 8:
Fry the Falafel: Once the oil is heated, carefully add the falafel balls to the skillet, lowering them gently into the hot oil. Make sure to leave ample space between the falafel balls to prevent overcrowding the skillet, which can lower the oil temperature and result in uneven cooking. I typically fit about 6 falafel in my skillet.
Step 9:
Cook the Falafel: Cook the falafel on the first side for about 30-60 seconds without disturbing it. This allows the falafel to form a golden-brown crust and prevents them from falling apart. The falafel is ready to be flipped when the sides have turned a golden color. Use a slotted spoon or spatula to gently flip the falafel and cook on the second side for another 30 seconds, or until they are evenly browned.
Step 10:
Remove and Drain: Once the falafel are cooked and golden-brown on all sides, remove them from the skillet using a slotted spoon or spatula. Place them on a paper towel-lined tray to drain any excess oil. This helps to keep the falafel crispy and prevents them from becoming soggy.
Step 11:
Repeat: Continue frying the remaining falafel balls in batches, making sure to maintain the oil temperature between batches. Allow the oil to reheat to the desired temperature before adding each new batch of falafel.
Step 12:
Serve and Enjoy: Serve the freshly cooked falafel immediately while they are still hot and crispy. They can be enjoyed in pita bread with hummus, tahini, and your favorite toppings, or as a side dish with salads and dips.
COOKING Rating:
- Ease of Preparation: Medium
- Taste: Excellent
- Overall: Highly Recommended
Serving Suggestions:
- Pita Pockets: Stuff warm pita pockets with falafel, hummus, tahini, chopped tomatoes, cucumbers, and pickled vegetables for a classic and satisfying meal.
- Falafel Salad: Top a bed of mixed greens with falafel, chopped vegetables, and a lemon-tahini dressing for a light and refreshing salad.
- Falafel Wraps: Wrap falafel in a large tortilla with your favorite spreads, vegetables, and sauces for a convenient and portable meal.
- Mezze Platter: Serve falafel as part of a mezze platter with hummus, baba ghanoush, tabbouleh, and other Middle Eastern delicacies.
- Snack: Enjoy falafel as a standalone snack with a dipping sauce like tahini, tzatziki, or spicy sriracha mayo.
Tips:
- Soaking Time: Ensure that the chickpeas are soaked for at least 24 hours to soften them properly. This is crucial for achieving the right texture and preventing the falafel from being too dense.
- Oil Temperature: Maintain the oil temperature at around 350°F (175°C) to ensure even cooking and prevent the falafel from absorbing too much oil.
- Chilling: Chilling the falafel before frying helps them hold their shape and prevents them from falling apart in the hot oil.
- Fresh Herbs: Use fresh parsley and cilantro for the best flavor. Avoid using dried herbs, as they will not provide the same vibrant taste.
- Spice Level: Adjust the amount of cumin, coriander, and other spices to your liking. Feel free to add a pinch of cayenne pepper or chili flakes for a spicier kick.
- Don’t Overcrowd: Avoid overcrowding the skillet when frying the falafel. Cook them in batches to maintain the oil temperature and ensure even cooking.
Prep Time: 25 minutes (plus 24 hours soaking time)
Cook Time: 15 minutes
Total Time: 40 minutes (plus 24 hours soaking time)
Nutritional Information:
Note: Nutritional information is an estimate and may vary based on specific ingredients and preparation methods. Caloric information does not include the calories added from frying.
- Calories: 70kcal
- Protein: 3g
- Sodium: 137mg
Conclusion
This Homemade Falafel recipe brings the vibrant flavors of the Middle East to your kitchen. The combination of soaked chickpeas, fresh herbs, and aromatic spices creates a delicious and satisfying meal that is perfect for any occasion. With simple instructions and helpful tips, this recipe ensures a batch of crispy, flavorful falafel that will impress your family and friends. Whether you serve them in pita pockets, wraps, or as a side dish, these homemade falafel are sure to be a hit.
Questions and Answers:
- Can I use canned chickpeas instead of dried chickpeas for this recipe?
- No, it is highly recommended to use dried chickpeas for this recipe. Canned chickpeas tend to be too soft and moist, which will result in a mushy and less flavorful falafel. The texture and consistency of the falafel are best achieved when using dried chickpeas that have been soaked for 24 hours.
- Why is it important to chill the falafel mixture before frying?
- Chilling the falafel mixture before frying is essential for several reasons. First, it helps the falafel hold its shape better during frying, preventing it from falling apart in the hot oil. Second, it allows the flavors to meld together, resulting in a more cohesive and flavorful final product. Finally, chilling the falafel helps to create a crispy exterior and a tender interior.
- What if I don’t have chickpea flour? Can I use regular flour instead?
- Yes, if you don’t have chickpea flour, you can substitute it with regular flour. While chickpea flour adds a slightly nutty flavor and a bit of extra binding power, regular flour will still work well to hold the falafel together. However, be mindful not to add too much flour, as this can make the falafel dense and dry.
- How can I make this recipe vegan?
- This recipe is already vegan as it doesn’t contain any animal products. Ensure all your ingredients, including the vegetable oil, are plant-based to keep it vegan.
- Can I bake these instead of frying them?
- Yes, you can bake the falafel as a healthier alternative to frying. Preheat your oven to 375°F (190°C) and place the falafel balls on a baking sheet lined with parchment paper. Lightly brush the falafel with olive oil and bake for about 20-25 minutes, flipping them halfway through, until they are golden brown and crispy. Keep in mind that baking will result in a slightly different texture compared to frying, but it is still a delicious and healthier option.


