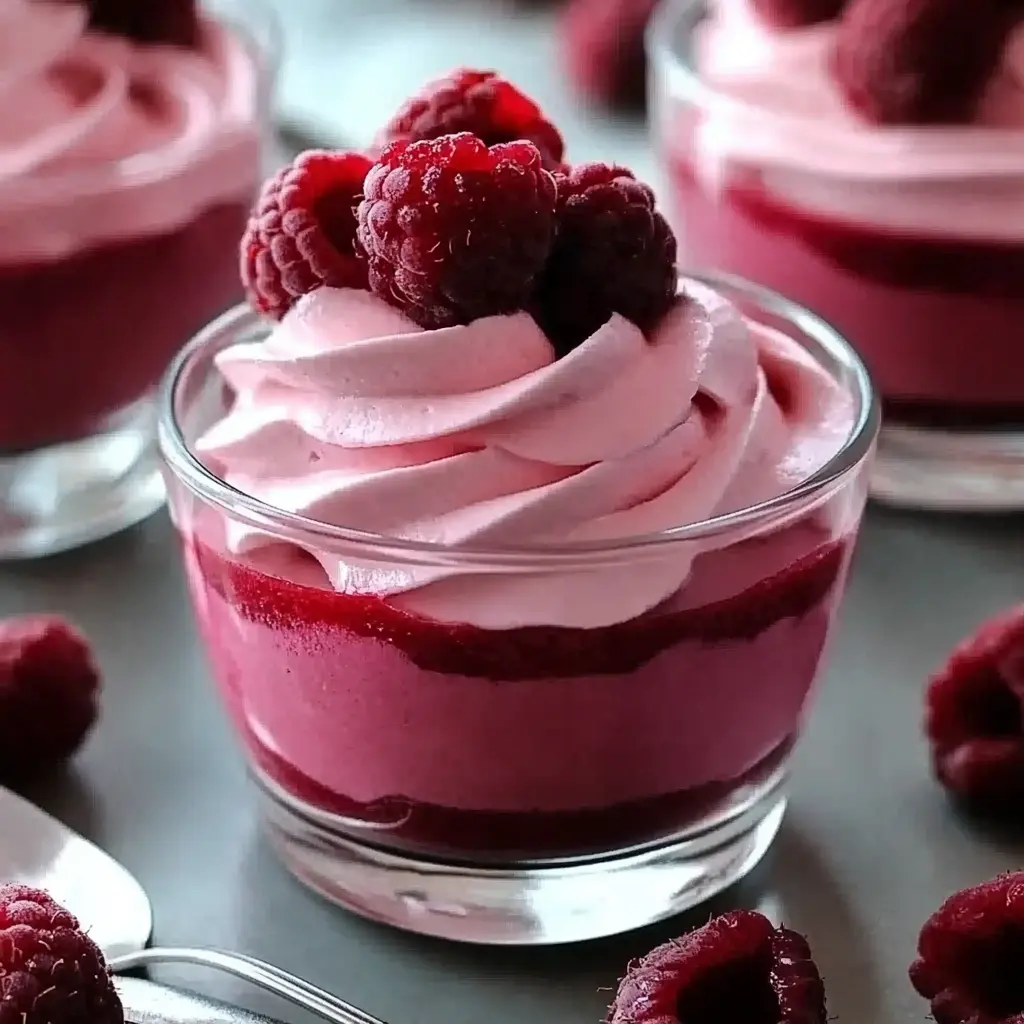
Description of this recipe
This No-Bake Raspberry Mousse Dessert is a delightful, light, and airy treat perfect for any occasion. It combines the tangy sweetness of fresh raspberries with the creamy richness of mousse, all without the need for baking. It’s an effortless dessert that impresses with its vibrant flavor and elegant presentation.
Why you will love this recipe
You will absolutely adore this recipe because it’s incredibly simple to make and requires no oven time, making it ideal for warm weather or when you’re short on time. The combination of fresh raspberries, creamy textures, and a hint of vanilla creates a symphony of flavors that dance on your palate. This dessert is naturally gluten-free and can be easily adapted to be dairy-free, ensuring everyone can enjoy a taste of this luscious creation. Plus, the vibrant pink color and fresh raspberry garnish make it a visually stunning dessert that will surely impress your guests.
Ingredients:
- 2 cups fresh raspberries (plus extra for garnish)
- 1 cup heavy whipping cream
- ½ cup powdered sugar
- 1 teaspoon vanilla extract
- 8 ounces cream cheese, softened
- ½ cup Greek yogurt (plain or vanilla)
- 1 tablespoon lemon juice
- 1 package (1 oz) unflavored gelatin
- ¼ cup cold water
Preparation:
Step 1: Prepare the Raspberries: Begin by gently washing the fresh raspberries under cool water. Pat them dry with a paper towel to remove excess moisture. Set aside a handful of the best-looking raspberries for garnish.
Step 2: Make the Raspberry Puree: In a blender or food processor, combine the remaining raspberries and puree until smooth. For a smoother texture, strain the puree through a fine-mesh sieve to remove the seeds. This step is optional but highly recommended, especially if you prefer a seedless mousse. Set the strained puree aside.
Step 3: Whip the Cream: In a large mixing bowl, pour in the heavy whipping cream. Use an electric mixer to whip the cream until soft peaks begin to form. Gradually add the powdered sugar, continuing to beat until stiff peaks form. Be careful not to overwhip the cream, as it can turn grainy. Once stiff peaks have formed, gently fold in the vanilla extract to infuse the cream with a subtle vanilla aroma.
Step 4: Mix Cream Cheese: In a separate bowl, add the softened cream cheese. Using an electric mixer, beat the cream cheese until it is smooth and creamy. This will ensure there are no lumps in your mousse. Add the Greek yogurt, lemon juice, and the prepared raspberry puree to the cream cheese. Mix until all ingredients are well combined, creating a uniform, pink-colored mixture. The lemon juice enhances the raspberry flavor and adds a refreshing tang.
Step 5: Dissolve the Gelatin: In a small, microwave-safe bowl, sprinkle the unflavored gelatin over the cold water. Allow it to sit for about 5 minutes to bloom, which means the gelatin will absorb the water and become a soft, thickened mass. This blooming process is crucial for the gelatin to dissolve properly. After it has bloomed, heat the gelatin mixture in the microwave for about 15 seconds until fully dissolved. Ensure the gelatin is completely clear and liquid.
Step 6: Combine Mixtures: Pour the dissolved gelatin into the raspberry cream cheese mixture. Stir well to incorporate the gelatin evenly throughout the mixture. Work quickly during this step, as the gelatin will begin to set as it cools.
Step 7: Fold in Whipped Cream: Gently fold the whipped cream into the raspberry mixture. Use a spatula and a gentle hand to combine the two mixtures without deflating the whipped cream. This step is vital for achieving a light and airy mousse texture.
Step 8: Transfer to Serving Dish: Spoon the mousse mixture into individual serving dishes or a large serving bowl. If using individual dishes, divide the mousse evenly. Smooth the top of the mousse with a spatula for a clean and professional look.
Step 9: Chill: Cover the serving dishes or bowl with plastic wrap and refrigerate for at least 2 hours, or until the mousse is set. Chilling allows the gelatin to fully set, giving the mousse its signature texture. For best results, chill for at least 4 hours or even overnight.
Step 10: Garnish and Serve: Once the mousse is set, remove it from the refrigerator. Garnish with additional fresh raspberries on top just before serving. This adds a burst of fresh flavor and visual appeal. You can also add a sprig of mint for an extra touch of elegance.
COOKING Rating:
Easy
Serving Suggestions:
This No-Bake Raspberry Mousse Dessert is perfect on its own, but you can elevate it with a few simple additions:
- Serve with a side of shortbread cookies or almond biscotti for dipping.
- Drizzle with a raspberry sauce or a white chocolate ganache for added richness.
- Layer it with crumbled graham crackers or ladyfingers for a more substantial dessert.
- Top with toasted almonds or pistachios for a delightful crunch.
Tips:
- Ensure your cream cheese is fully softened before mixing to avoid lumps in the mousse.
- Don’t overwhip the heavy cream, as it can become grainy.
- Strain the raspberry puree to remove seeds for a smoother texture.
- Work quickly when adding the dissolved gelatin to the raspberry mixture to prevent it from setting prematurely.
- Chill the mousse for at least 2 hours, or preferably longer, to ensure it sets properly.
Prep Time:
20 minutes
Cook Time:
0 minutes
Total Time:
2 hours 20 minutes (includes chilling time)
Nutritional Information:
(Note: Nutritional information is approximate and can vary based on specific ingredients and portion sizes.)
Calories: 250 kcal
Protein: 5g
Sodium: 50mg
Conclusion
This No-Bake Raspberry Mousse Dessert is a delightful treat that is as easy to make as it is delicious. Its vibrant flavor, creamy texture, and elegant presentation make it a perfect choice for any occasion. Whether you’re hosting a dinner party, celebrating a special event, or simply craving a sweet treat, this mousse is sure to impress. Enjoy the refreshing taste of raspberries combined with the luxuriousness of mousse, all without the need for baking. It’s a dessert that brings joy with every spoonful, making it a must-try for any dessert lover.
Frequently Asked Questions
Q1: Can I use frozen raspberries instead of fresh ones?
A: Yes, you can use frozen raspberries if fresh ones are not available. Be sure to thaw them completely and drain any excess liquid before pureeing. Keep in mind that frozen raspberries may release more liquid, so you might need to adjust the consistency of the mousse.
Q2: Can I make this dessert dairy-free?
A: Absolutely! To make this dessert dairy-free, use dairy-free cream cheese, such as a cashew-based or coconut-based cream cheese alternative. Also, use coconut cream instead of heavy whipping cream. Chill the can of coconut cream overnight and only use the thick cream that separates from the liquid. For the Greek yogurt, use a dairy-free alternative like coconut yogurt or almond yogurt.
Q3: How long does this mousse last in the refrigerator?
A: This mousse can be stored in the refrigerator for up to 3 days. Be sure to cover it tightly with plastic wrap to prevent it from absorbing any odors. The texture may change slightly over time, but it will still be delicious.
Q4: Can I add other fruits to this mousse?
A: Yes, you can customize this mousse by adding other fruits. Strawberries, blueberries, or blackberries would all complement the raspberry flavor nicely. Simply add them to the raspberry puree or use them as a garnish.
Q5: Can I make this mousse ahead of time?
A: Yes, this mousse is perfect for making ahead of time. In fact, it’s best to make it at least 4 hours in advance, or even the day before serving, to allow the gelatin to fully set and the flavors to meld together. Just be sure to store it properly in the refrigerator until you’re ready to serve.


