Description
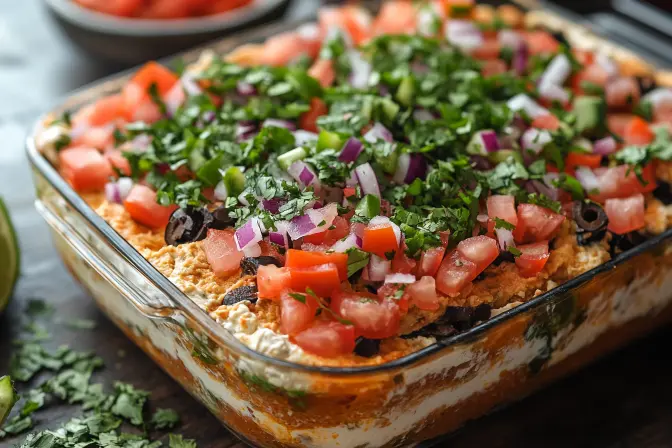
This isn’t just any 7-layer dip; it’s an explosion of flavor and texture in every bite! Imagine layers of creamy refried beans, zesty guacamole, tangy sour cream infused with taco spices, vibrant salsa, sharp cheddar cheese, juicy tomatoes, salty black olives, and fresh green onions. This dip is the ultimate crowd-pleaser, perfect for parties, game days, or any casual gathering where you want to impress your guests with minimal effort. It’s easy to assemble, endlessly customizable, and guaranteed to disappear fast.
Why You Will Love This Recipe
- Flavor Fireworks: Each layer contributes a unique flavor profile, creating a symphony of tastes that dance on your palate.
- Effortless Elegance: This recipe requires minimal cooking. It is mostly assembly, making it ideal for busy schedules.
- Crowd-Pleasing Guarantee: This dip is universally loved and always a hit at any gathering.
- Customizable Delight: Feel free to swap out ingredients based on your preferences or dietary needs.
- Make-Ahead Marvel: You can assemble this dip hours ahead of time, allowing the flavors to meld together beautifully.
Ingredients:
- 32 oz refried beans – two 16-oz cans
- 1 oz taco seasoning – 3 Tbsp divided
- 2 cups sour cream
- 2 cups guacamole
- 21 oz chunky salsa – drained through fine mesh strainer
- 2 cups shredded cheddar cheese
- 4 Roma tomatoes – chopped, seeds removed, and drained
- ½ cup sliced black olives – drained
- ½ cup chopped green onion
- Tortilla chips to serve
Preparation:
Step 1: Bean Base Perfection: Begin by creating the foundational layer of the dip. In a medium-sized mixing bowl, combine the two 16-oz cans of refried beans with 1 ½ tablespoons of taco seasoning. Ensure the taco seasoning is thoroughly incorporated into the beans for a uniform flavor. The beans act as an anchor to the dip, ensuring no chips are ever without deliciousness. Give it a good mix until the taco seasoning is evenly dispersed.
Step 2: Spread the Bean Magic: Using a spatula, carefully spread the seasoned bean mixture evenly across the bottom of a 9×13 inch casserole dish. This layer should be smooth and consistent to provide an even base for the rest of the ingredients. Aim for a uniform layer of the refried beans so that every bite is filled with delicious flavor.
Step 3: Guacamole Goodness: Now, evenly spread 2 cups of your favorite guacamole on top of the refried bean layer. Whether you prefer store-bought or homemade guacamole, the quality of this layer will greatly influence the overall taste of the dip. Feel free to get creative with the guacamole, adding lime juice, cilantro, or even a pinch of cumin for extra flavor.
Step 4: Taco-Infused Sour Cream Dream: In a separate medium-sized mixing bowl, whisk together 2 cups of sour cream with the remaining 1 tablespoon of taco seasoning. This step adds a creamy, tangy element to the dip with a hint of spice. The sour cream balances the richness of the guacamole and provides a cooling contrast to the other layers.
Step 5: Sour Cream Layer Application: Spread the taco-infused sour cream evenly over the guacamole layer. Be gentle to avoid disturbing the guacamole underneath. The sour cream layer will create a smooth canvas for the salsa to sit upon. A clean, even spread of the sour cream guarantees a visually appealing and structurally sound dip.
Step 6: Salsa Situation: Drain a 21-oz jar of chunky salsa through a fine-mesh strainer to remove as much excess liquid as possible. This step is crucial to prevent the dip from becoming soggy. Once drained, spread the salsa evenly over the sour cream layer. The salsa provides a burst of fresh, vibrant flavor that complements the other layers beautifully.
Step 7: Cheddar Cheese Cascade: Sprinkle 2 cups of shredded cheddar cheese generously over the salsa layer, ensuring it’s evenly distributed. The cheese adds a sharp, savory element to the dip that perfectly complements the spice of the taco seasoning and the freshness of the salsa. It also adds a visual appeal to the dip.
Step 8: Tomato Topping Touch: Top the cheddar cheese layer with 4 chopped Roma tomatoes, making sure to remove the seeds and drain any excess liquid. This step adds a juicy, refreshing component to the dip and prevents it from becoming watery. Be certain the tomatoes are evenly dispersed across the cheese.
Step 9: Olive and Onion Ornaments: Sprinkle ½ cup of sliced black olives and ½ cup of chopped green onions evenly over the tomato layer. These toppings add a salty, savory crunch that perfectly complements the other flavors and textures of the dip. The colors of the black olives and green onions also add a visually appealing finish to the dip.
Step 10: Chilling Charm: Cover the casserole dish tightly with plastic wrap and refrigerate for at least 1 hour, or preferably longer, to allow the flavors to meld together. The longer the dip sits, the more harmonious the flavors will become. This step allows the ingredients to marry and enhance each other, resulting in a more cohesive and flavorful dip.
Step 11: Serve and Savor: When ready to serve, remove the dip from the refrigerator and serve with your favorite tortilla chips. You can also accompany it with vegetable sticks, crackers, or even toasted baguette slices for a more diverse serving option.
COOKING Rating:
Easy
Serving Suggestions:
- Serve with a variety of tortilla chips – regular, blue corn, or even flavored chips.
- Offer a selection of fresh vegetables like carrot sticks, celery, and bell pepper strips for dipping.
- Consider providing warm pita bread or naan for a more substantial dipping experience.
- Garnish with a sprinkle of fresh cilantro or a drizzle of hot sauce for an extra kick.
- Present the dip in a visually appealing serving dish to enhance the overall presentation.
Tips:
- Drain, Drain, Drain: Make sure you drain the tomatoes and salsa very well, because nobody wants soggy dip.
- Use Good Quality Ingredients: The flavor will always come through, and you want to make sure you have the very best flavor!
- Make it Vegetarian: Swap out the refried beans with chorizo or sausage for a spicy kick, or add a layer of seasoned ground beef for a heartier dip.
- Spice It Up: Add a pinch of cayenne pepper to the sour cream or a drizzle of hot sauce to the salsa for a spicier dip.
- Make It Ahead: This dip can be made up to 24 hours in advance, making it perfect for parties and gatherings.
Prep Time: 20 minutes
Cook Time: 0 minutes
Total Time: 20 minutes + 1 hour (chilling)
Nutritional Information:
- Calories: 181kcal
- Carbohydrates: 12g
- Protein: 6g
- Fat: 13g
- Saturated Fat: 5g
- Polyunsaturated Fat: 1g
- Monounsaturated Fat: 5g
- Cholesterol: 25mg
- Sodium: 707mg
- Potassium: 273mg
- Fiber: 5g
- Sugar: 4g
- Vitamin A: 748IU
- Vitamin C: 6mg
- Calcium: 134mg
- Iron: 1mg
The nutritional information provided is an estimate and is per serving.
Conclusion
The 7-Layer Fiesta Dip is more than just a dip; it’s a celebration of flavors, textures, and good times. Its simple preparation, customizable ingredients, and crowd-pleasing nature make it the perfect dish for any occasion. So gather your ingredients, assemble the layers, and get ready to enjoy a fiesta in every bite!
Questions and Answers:
Q1: Can I make this dip ahead of time, and if so, how long will it last in the refrigerator?
A: Absolutely! One of the best things about this 7-Layer Fiesta Dip is that it can be made ahead of time, making it a fantastic option for parties and gatherings. You can prepare the dip up to 24 hours in advance, allowing the flavors to meld together beautifully and deepen over time. Just ensure that the dip is tightly covered with plastic wrap to prevent it from drying out or absorbing any unwanted odors from the refrigerator. When you’re ready to serve, simply remove it from the fridge and you’re good to go!
Q2: I don’t have all the exact ingredients listed. Can I substitute anything?
A: Flexibility is key when it comes to the 7-Layer Fiesta Dip. You can definitely substitute ingredients based on your preferences or what you have on hand. For example, if you don’t have Roma tomatoes, you can use any other type of tomato, just make sure to remove the seeds and drain any excess liquid. You can also swap out cheddar cheese for Monterey Jack or a Mexican cheese blend. If you are not a fan of guacamole, you can add another layer of sour cream or cheese. The possibilities are endless!
Q3: How can I make this dip vegetarian or vegan?
A: Making this dip vegetarian is incredibly easy since the base recipe is already vegetarian-friendly! To make it vegan, the two key ingredients to substitute are the sour cream and cheese. There are several delicious vegan sour cream alternatives available in most grocery stores made from ingredients like cashews or soy. For the cheddar cheese, you can use a good quality vegan shredded cheddar alternative. Ensure the refried beans you use are vegetarian or vegan, as some recipes may contain lard.
Q4: My dip tends to get watery. What can I do to prevent that?
A: Soggy dip is a common issue, but easily avoidable! The most important step is to thoroughly drain the salsa and the chopped tomatoes. Use a fine-mesh strainer to remove as much excess liquid as possible before adding them to the dip. Additionally, using thicker sour cream or even Greek yogurt can help maintain the dip’s consistency. Avoiding overly ripe tomatoes can also reduce the amount of liquid released.
Q5: Can I add any protein to this dip to make it more filling?
A: Absolutely! Adding protein is a great way to make the dip more substantial and satisfying. You could add a layer of seasoned ground beef or shredded chicken between the refried beans and the guacamole. Alternatively, you can incorporate black beans or pinto beans for a vegetarian protein boost. For a spicier kick, consider adding crumbled chorizo.